The question of how to install GA4 on Shopify has been on the rise recently for an evident reason. Any ecommerce business owner knows how important data is. It helps you understand your customers, adjust your marketing and SEO strategies, and be more in tune with the market. And there is no better tool than the powerful analytical suite from Google.
GA4 started to replace Universal Analytics in March 2023, but not all companies have been rushing to adopt it. We understand the hesitation but find GA4’s powerful tracking a must for modern companies. This is why GenovaWebArt has prepared this guide based on our own experience.
In this article, we’ll teach you how to install Google Analytics on Shopify and configure it to work for you. It’s a step-by-step guide that makes the process straightforward, though we’d be happy to help anyone who still has questions after reading it. You can look at our Shopify case studies to see what our team can do. In the meantime, let’s talk about the installation.

Steps to Install and Set Up GA4 on Shopify Store
There are three core steps you should take to fully install and configure GA4. They are:
- Create a GA4 property
- Add tags to your store
- Connect your GA account to your Google Ads account
- Verify installation integrity
The last one is technically optional, but we’d strongly recommend doing it, and we’ll explain why in the appropriate section.
Create a GA4 Property
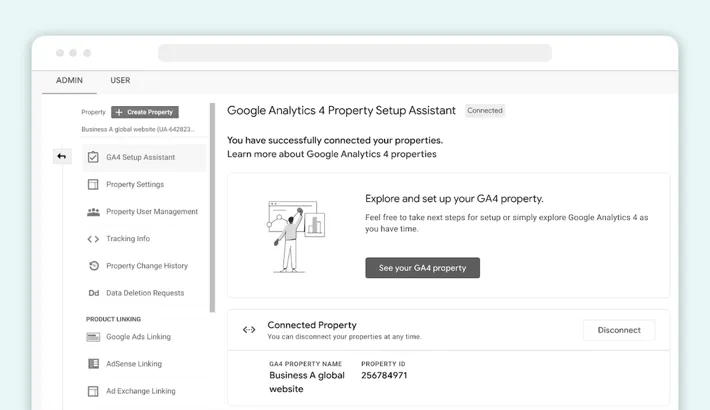
We won’t mention this as a separate step, but before being able to create a property, you’ll need to create a Google account or log into it. If you already have one, good. If not - go ahead and create one.
Make sure to choose which data you want to be shared. It’s worth it to visit the Data menu and enable Enhanced Measurement. This is vital for ecommerce businesses. If you do that, remember to also turn on Enhanced Reporting.
Once that’s done, open the admin panel of that account by tapping the button in the bottom left. Then, simply click Create Property and choose the Web type. Enter a preferred name and hit Create. Once the property is created, copy the property’s Measurement ID. You’ll need this unique code to set up tracking.
Install GA4 Tags in Your Store
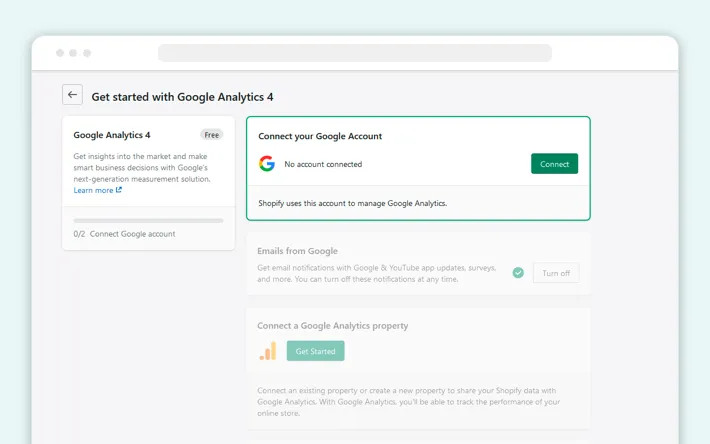
There are two ways to do Shopify Google Analytics 4 setup: through native Shopify tools or via the Google Tag Manager. We’ll cover both.
So, for the first option, open your Shopify store and its admin panel. Choose Online Store and then Preferences. There’ll be a field with the title Google Analytics. Click Manage Pixel and Create Sales Channel.
You’ll be taken to a new window (note the Google & YouTube field that appeared in the sidebar). Here, click to connect your Google account. Then, paste the Tag ID for the GA4 property and hit the Connect button.
The second option is for those already using Tag Manager. Go to the TM website and sign in to your account. Choose Tags, then New to start a fresh tag. The type should be set to Google Analytics: GA4 Configuration. Insert the ID from step 1 and hit Save.
Now, you need to set a trigger. This can be some interaction from a customer like viewing a page or clicking a link. Once that is done, you can hit Submit and your Tag will be integrated. That’s how you install GA4 on Shopify.
Link GA4 account to Google Ads
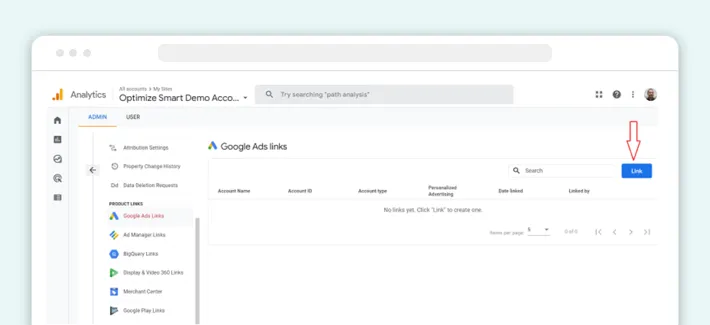
This step requires you to already have a Google Ads account or at least start one. If you don’t use this platform, feel free to skip it. Although, thanks to how easy it is to connect the two and the convenience of sharing data, we’d recommend having this setup. For those that have Google Ads, here’s what to do.
Once you have setup GA4, visit the Admin section and choose Data Streams. Pick the Web data stream from the property you’ve created. Scroll to the Google Ads section below and click the Link Accounts button. There’ll be some simple instructions to follow to get the two connected.
With this, you’ll be able to track customer behavior on your site, as well as their responses to your marketing efforts outside the website. It’s a full-circle analysis that lets you be more effective with how and where you serve ads. That’s why we recommend this step, even if it’s not mandatory.
Verify Installation
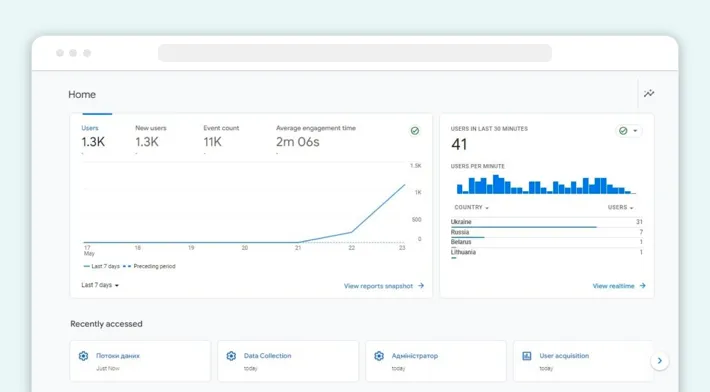
After you’ve done all the steps of your GA4 Shopify installation, open your website and browse it like a customer would. Click on some links, put a product into your cart, and view some pages without clicking anything. Then, open the GA4 account and choose the Realtime setting in the left sidebar.
It should show you a graph with data concerning your own actions. If you notice that some of the things you did haven’t been registered, there’s a problem in the tool’s connection to your site. In that case, it may be best to directly consult an expert. Our team offers custom Shopify solutions that will help with this problem and many others. Feel free to contact us for a quick consultation.
What Data Can I Track with GA4 on My Shopify Store?
Now that you know how to add GA4 to Shopify, let’s talk about what data it can register. This includes customer actions and sale events, as well as customer data associated with their online presence.
Ecommerce Events
Any time a customer makes a purchase, adds a product to cart, or even views one of your offerings, GA4 should register it. This helps you see which hours may be a peak for sales or connect certain behaviors to a sale outcome. For example, you’ll be able to tell why some customers add a product to cart but don’t go through with the purchase.
Conversion Information
Beyond just knowing the conversion rate, GA4 on Shopify will tell you where these conversions are coming from. This helps determine the efficiency of your marketing campaigns, as well as potential blindspots in your general marketing.
User Profiles
With the data from GA4, you should be able to track demographics and user interests. Thanks to that, you can target ads better or adjust your website to be more appealing to your core audience. Similarly, it will analyze user retention, letting you know if some parts of your store aren’t engaging enough.
Traffic and Behaviors
Lastly, Google Analytics 4 Shopify integration will let you see where your traffic is coming from and how the users heave on the site. Whether some click once and leave or end up spending hours in the store, all this data is helpful to knowing your customers. These insights are essential to make your marketing better and adjust your UX to fit the clients.
How Can GenovaWebArt Help Me?
With GA4 being such a powerful suite for analytics tracking, a business should make the most of it. There’s a variety of metrics to follow and, with proper integration, you can harness GA4’s features to improve your sales and know your customers better. To do that, the tool has to be appropriately configured.
To get the maximum benefits out of your GA4, turn to GenovaWebArt. With more than a decade on the market, we have years of experience with Shopify stores. From full redesigns to custom app development, GenovaWebArt has done it all. So if you need to add analytics for your Shopify, drop us a line.


