There are multiple things that eCommerce store owners need to take care of when it comes to customer experience. From the moment the consumer visits the online store, selects the product, and checks out until receiving the package: all this is the merchant’s responsibility.
Among all these duties, logistics plays a significant role in providing a seamless customer experience and your store’s overall success. Yet, the delivery process may cause some uncertainty, given that you delegate this task to third parties. The good news is that it won’t be the case if you set up your shipping on Shopify.
If you are wondering how Shopify shipping works, let this article be your step-by-step guide to setting up Shopify shipping. GenovaWebArt has been an expert in such setups through the years, allowing us to share our experience in this post.

Core Steps to Set Up Shipping Rates on Shopify
We won’t keep you waiting and will get straight to the point. So, how to add shipping rates on Shopify? Here are a few steps to get everything just right:
1. Add Shipping Locations
The first thing you need to do is add shipping locations. These are the locations from which all your orders come.
You should also know that Shopify defaults your online store address as the shipping location. If this address is correct, you do not need to make any changes. However, if you want to add a few more or change the main one, here’s what you can do:
1. Open your Shopify dashboard and click on the “Settings” button.
2. Select “Locations” from the drop-down menu.
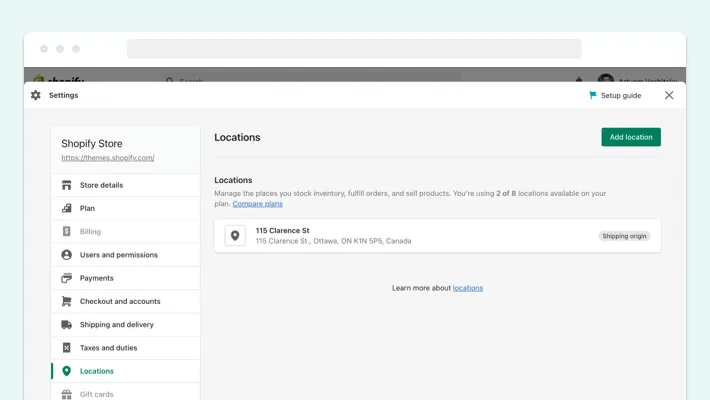
3. Click on the “Add Location” button.
4. Enter shipping address details.
5. Check the “Fulfill online orders from this location” box.
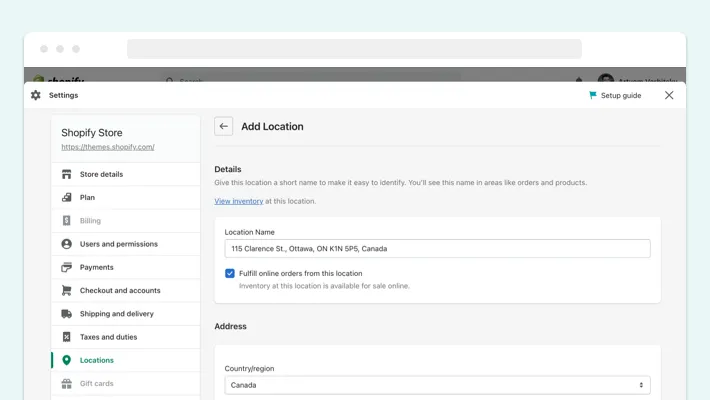
6. Click “Save.”
Remember that Shopify has particular restrictions on the number of shipping locations you can specify. It depends on your Shopify plan:
- Shopify Lite — 3 shipping locations
- Basic Shopify — 4 shipping locations
- Shopify — 5 shipping locations
- Advanced Shopify — 8 shipping locations
- Shopify Plus — 20 shipping locations and more
Let’s now proceed to the next step.
2. Create Shipping Profiles
Online shops using Shopify with only one shipping location specified automatically use general shipping rates. It’s convenient for companies with a simple shipping setup. Yet, if an eCommerce store has indicated multiple locations, it needs a custom shipping profile. It’ll help manage the delivery of goods more efficiently.
Here are a few steps to create a shipping profile on Shopify:
1. Open your Shopify dashboard and click on the “Settings” button.
2. Select “Shipping and delivery” from the drop-down menu.
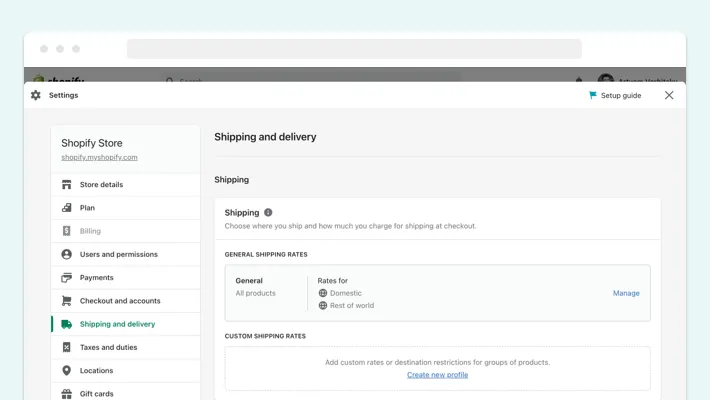
3. Click “Create new profile” in the “Custom shipping rates” section.
4. Enter a profile name and add relevant products.
5. Make any necessary changes to your locations.
6. Click “Create shipping zone” in the “Shipping to” section.
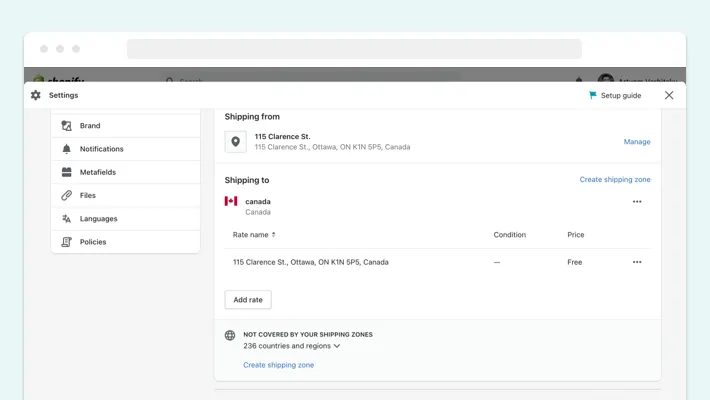
7. Enter the name of a shipping zone and choose the necessary countries or regions.
8. Click “Add rate” for a shipping zone and then “Done” to confirm your configurations.
9. Click “Save.”
3. Set Shipping Zones
We have just mentioned the shipping zones. Let’s talk about them in more detail.
A shipping zone is a set of countries or regions subject to the same shipping rate. For example, it can be the European Union or the Americas, depending on your customers’ location.
Here’s how you can set up a shipping zone:
- Open your Shopify dashboard and click on the “Settings” button.
- Select “Shipping and delivery” from the drop-down menu.
- Click “Manage rates” in your custom shipping profile.
- Next to the location group where you add a shipping zone, select “Create shipping zone.”
- Enter the name of a shipping zone and choose the necessary countries or regions.
- Click “Done” to confirm your configurations.
- Add shipping rates and click “Save.”
4. Set Shipping Rates
Another thing you need to figure out is setting up shipping rates on Shopify. To do this, ensure that you have completed the previous steps, namely, creating shipping profiles and zones.
You can choose from four types of Shopify custom shipping rates: flat, calculated, mark-up or discount calculated, and free shipping rates. Let’s discuss each of them separately and learn how to configure them.
Flat Shipping Rates
A flat shipping rate is a specific shipping cost that customers must pay at checkout. You can choose such a fee for a particular shipping zone or even for a certain weight or price category of products.
Here is how you can set up such a rate:
- Open your Shopify dashboard and click on the “Settings” button.
- Select “Shipping and delivery” from the drop-down menu.
- Click “Manage rates” in your custom shipping profile.
- Next to the zone for which you are adding a rate, click “Add rate” and enter its name and amount.
- Optionally, you can click “Add conditions,” where you can select weight-based or price-based requirements.
- Click “Done” to confirm your configurations and then “Save.”
Calculated Shipping Rates
A calculated shipping rate is a fee set at the checkout by third-party delivery providers according to the order details.
To set such a rate, you need to go through the following procedure:
- Open your Shopify dashboard and click on the “Settings” button.
- Select “Shipping and delivery” from the drop-down menu.
- Click “Manage rates” in your custom shipping profile.
- Next to the zone for which you are adding a rate, click “Add rate.”
- Choose “Use carrier or app to calculate rates.”
- Select the shipping provider in the drop-down menu.
- Select the shipping methods in the “Services” section.
- Optionally, choose whether to offer new shipping services automatically in the “Future services” section.
- Optionally, add handling fees in the “Handling fee” section.
- Click “Done” to confirm your configurations and then “Save.”
Mark-Up or Discount Calculated Shipping Rates
You can encourage more customers to check out by setting markup or discount calculated rates. Here's how you can set a calculated discount:
- Open your Shopify dashboard and click on the “Settings” button.
- Select “Shipping and delivery” from the drop-down menu.
- Click “Manage rates” in your custom shipping profile.
- Click “Edit rate” next to the rate you want to adjust.
- Set the rate changes in the “Handling fee” section.
- Click “Done” to confirm your configurations and then “Save.”
Free Shipping Rates
A free shipping rate is when the customers do not pay a shipping fee. It’s that simple. You can set up free shipping on Shopify by going through the following steps:
- Open your Shopify dashboard and click on the “Settings” button.
- Select “Shipping and delivery” from the drop-down menu.
- Click “Manage” next to the “General shipping rates.”
- Add a free shipping rate next to each shipping zone by clicking “Add rate,” entering the rate’s name, and setting a zero price in the “Price” field.
- Click “Done” to confirm your configurations and then “Save.”
5. Fundamental Shipping Terms
Finally, learning how to set up Shopify shipping requires understanding some basic concepts you’ll encounter along the way. Here are a few terms to remember:
- Shipping rates. It is the fee that customers must pay to receive their order. It’s also one of the primary Shopify scripts for your eCommerce store’s checkout optimization.
- Shipping carriers. These are companies that take on logistic matters. That is, they handle all the responsibilities of shipping customer orders.
- Shipping profiles. These are the means thanks to which merchants can set delivery features according to specific locations, types of products, etc.
- Shipping labels. These contain information about the order’s recipient and help shipping carriers deliver to the right location.
How to Edit or Delete a Shipping Rate
Another thing that you may need to run your online business effectively is the ability to change and remove the tariff. Here is a brief guide on how to do it.
How to Edit Shipping on Shopify?
If you are wondering how to edit shipping on Shopify don’t forget that you can always go back to your set up Shopify shipping and edit the rates. Look at the following steps:
- Open your Shopify dashboard and click on the “Settings” button.
- Click “Manage” next to the necessary shipping profile.
- Click the “...” button next to the rate you want to edit.
- Click “Edit rate” and submit the necessary changes.
- Click “Done” to confirm your configurations and then “Save.”
Deleting Shipping Rates
You can also effortlessly remove shipping rates in Shopify that are no longer relevant. Here’s how to do it:
- Open your Shopify dashboard and click on the “Settings” button.
- Click “Manage” next to the necessary shipping profile.
- Click the “...” button next to the rate you want to delete.
- Click “Delete” in the drop-down menu.
- Click “Save.”
Additional Tips for Setting Up Shipping on Shopify
If you’re still wondering how to add shipping to Shopify successfully, here are some more tips.
Define Your Product Weight and Preferred Packaging
It would be good to establish what packaging you need for your products. Shopify offers many options, such as subscription boxes, envelopes, etc. You should also specify the exact weight of your goods in advance. It will help to calculate the shipping costs correctly.
Prepare Your Shipping Labels
Don’t forget to print the shipping labels and attach them to the orders. Thanks to this, you will be sure that the goods will reach the buyer at the specified addresses.
Set Up Notifications
Another tip that will make life easier for you and your customers is setting up Shopify email notification system. By sending messages, you will inform your customers, for example, where their order is, etc. It will significantly improve the shopping experience with your online store.
Issues with Setting Up Shipping Rates
If you use Shopify’s default settings for shipping rates, you risk encountering some limitations. That is why it is better to add shipping to Shopify yourself.
In particular, potential issues may include:
- Incorrect calculation of shipping prices
- The complexity of shipping procedures management
- The difficulty of scaling your online store
On the other hand, if you configure shipping locations, zones, profiles, and rates yourself, you will get more means to control processes in your eCommerce store. You’ll have convenient shipping features broken down by categories and accessible right from your Shopify dashboard.
GenovaWebArt Experience in Setting Up Shopify Shipping
GenovaWebArt has been helping online stores enter global Shopify consumer markets for the last nine years. During this period, we cooperated with about 200 eCommerce businesses, delivering various services and setting up shipping on Shopify included.
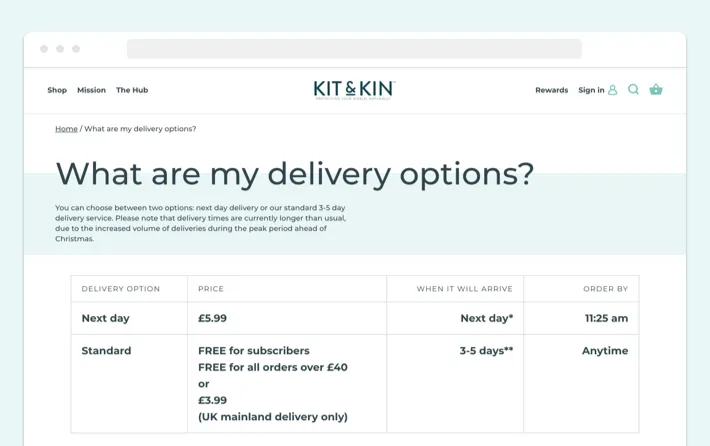
For example, we set up Shopify delivery for the Kit & Kin online childcare store. Here we offer a flat shipping rate and a free delivery option for subscribers and orders over £40.
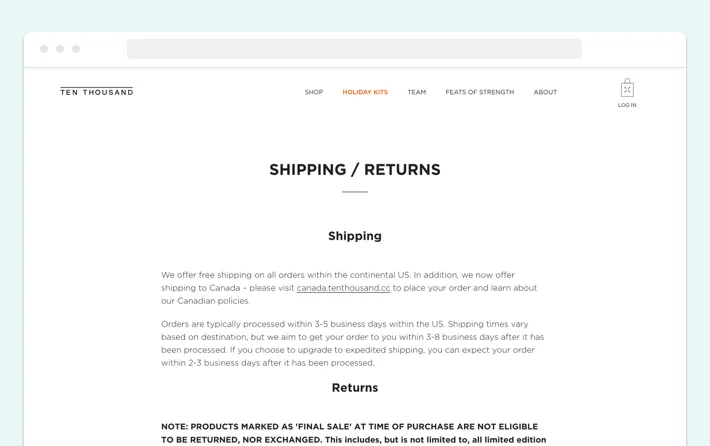
Another eCommerce business for which we configured the shipping page is the Ten Thousand clothing brand. Here we set up free shipping for all orders across the US and to Canada for orders over 150 CAD.
Besides the Shopify shipping setup, our experts can help you with the following tasks:
- Shopify app development
- Shopify theme development and customization
- Shopify store design
- Migration to Shopify
- And many more
So now you know how to setup Shopify shipping. Want to learn more? Feel free to check out our profound portfolio, listing numerous brands on Shopify. And if suddenly you have never heard, or want to know more about DTC brands on Shopify, we have prepared our new guide especially for you.
Conclusion
The satisfaction rate of your customers, the number of your sales, and the overall success of your online store depend on the correct Shopify shipping settings.
We hope that with our detailed guide, you learned how to set up shipping on Shopify. Yet, if you need assistance in this matter, you can always hire experts who will offer the best solutions for your eCommerce business. If you’re already looking for such specialists, GenovaWebArt can help. All you have to do is contact our team.


![Shopify Sales Channels [Complete Guide] - GenovaWebArt blog article, banner image Shopify Sales Channels [Complete Guide] - GenovaWebArt blog article, banner image](https://genovawebart.com/hubfs/img/webp/hero-banner-blog-article-shopify-sales-channels.webp)


