As a Shopify store owner, you know how critical the checkout process is for your business. It influences your sales, conversion rates, and overall customer satisfaction with your brand.
Even though Shopify offers a straightforward, pre-defined checkout, it may not be enough to cover your business needs.
What if you want to add more features, special offers, and a design that fully reflects your brand?
Customizing the checkout page in Shopify is your answer.
Today, GenovaWebArt will get you through the process of Shopify checkout customization.
We’ll teach you how to improve your customer experience and reduce Shopify cart abandonment with a few steps.
Having a profound background in Shopify checkout page editing for such online stores as Winky Lux and Ten Thousand, we can share practical insights on this topic.
Table of Contents
- Why Checkout Page Customization Is Important for Your Business
- Types of Checkout Page Customizations on Shopify
-
How to Customize Shopify Checkout Page
- Add a Background Image for the Banner
- Add a Logo to the Shopify Checkout Page
- Add a Background Image or Color to the Main Content Area
- Change the Form Fields Color
- Add a Background Image or Color to the Order Summary
- Replace or Remove an Image from the Checkout Page
- Modify the Typography on the Shopify Checkout Page
- Modify the Button and Accent Colors
- Add Post-Purchase Features to the Checkout Page
- 6 Useful Widgets and Apps for Shopify Checkout Customization
- Checkout Customizations with Shopify Plus
- Test and Measure the Effectiveness of Your Shopify Checkout Page
- GenovaWebArt Experience
- Wrapping Up
- FAQ
Why Checkout Page Customization Is Important for Your Business
Shopify checkout customization is a viable solution if you are unsatisfied with your checkout page design, want to add new features, or plan to introduce special offers for your customers.
Customization brings numerous benefits to the business and is surely worth the time and effort spent. It’s a way to increase your profits and sales, boost your conversion rate, and get a significant ROI. Here are the main reasons to customize the checkout page on Shopify.
Increase Your Conversion Rate
By modifying the checkout page on Shopify, you instantly boost your conversion rate. How so? You can leverage various customization options:
- Adding FAQs that answer common customer requests before they abandon the checkout page
- Providing detailed info on shipping and returns
- Making forms completion a fast and straightforward process
- Engaging your customers with targeted ads
Improve Your On-Brand Experience
You probably don’t want to disrupt a smooth customer experience with a checkout page that doesn’t match your Shopify online store’s general look and feel. Yet, you can modify your checkout to ensure its consistency with your brand. That, in turn, will improve your customer loyalty.
Boost Your Sales
The opportunity to increase sales is another reason to edit the checkout page on Shopify. Customization allows you to introduce cross-selling and upselling features to prompt your customers to buy more. For example, you can cross-sell a phone case to the person purchasing a mobile phone in your store.
Read also: How to Create an Effective About Us Page on Shopify for Higher Conversions
Types of Checkout Page Customizations on Shopify
If you are to edit Shopify checkout page, look at the options you have. Here’s what you can do:
Simple Visual Shopify Checkout Customizations
It’s a Shopify checkout customization option you can access through your theme editor. In this case, you don’t use any extra tools, and this kind of editing is available in all Shopify pricing plans except Shopify Plus.
To modify your Shopify online store’s checkout template, you need to click on ’Customize’ next to your current theme, proceeding to ’Theme Settings’ and the ’Checkout’ on the left.
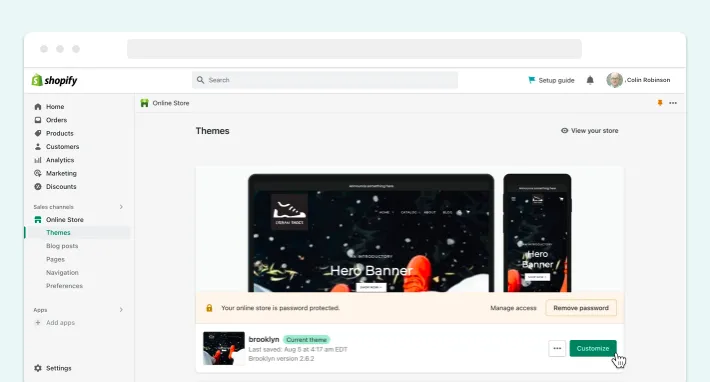
Here are a few possible checkout customizations:
- Adding a banner or another relevant image as a header
- Adding your brand’s logo, setting its size and position
- Changing the color of the checkout page’s sections, buttons, text, and links
- Adding email and SMS marketing signups
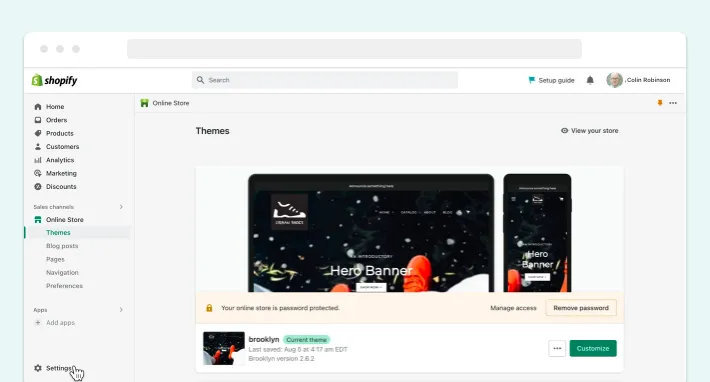
You can also open the ‘Settings’ section in your Shopify admin and select ‘Checkout and accounts’ to change customer login options and required input fields.
Checkout Customizations via Apps and Other Tools
You can leverage various apps, tools, and Shopify Extensibility functionality to customize your checkout even more. Here are some possible modifications:
- Displaying a free shipping threshold
- Changing the default breadcrumb navigation to the progress bar
- Adding a gift along with a purchase
- Upselling and cross-selling products
- Integrating a checkout timer
- Adding trust badges
- Displaying contact information
- Allowing customers to leave feedback
- Creating a single-page checkout
Shopify Plus Customizations
Another way to Shopify checkout page customization is available for the Shopify Plus pricing plan subscribers. Here you can change the checkout page’s design and features entirely since Shopify Plus provides access to the source code.
Yet, you may require experienced developers like GenovaWebArt to tackle that task.
How to Customize Shopify Checkout Page
We briefly mentioned various Shopify checkout page customization options. Let’s take a closer look at them so you can modify your checkout.
Add a Background Image for the Banner
A banner shows your online store’s name at the top of each checkout page. You may want to alter the background of that banner to match your brand better. Here’s how you can do it:
- Open your Shopify Admin, select ‘Online Store,’ and then ‘Themes.’
- Click on a ‘Customize’ button near your current theme.
- Select ‘Theme Settings’ in a theme editor and go to the ‘Checkout’ section.
- In the ‘Banner’ section, click on the ‘Select Image’ button.
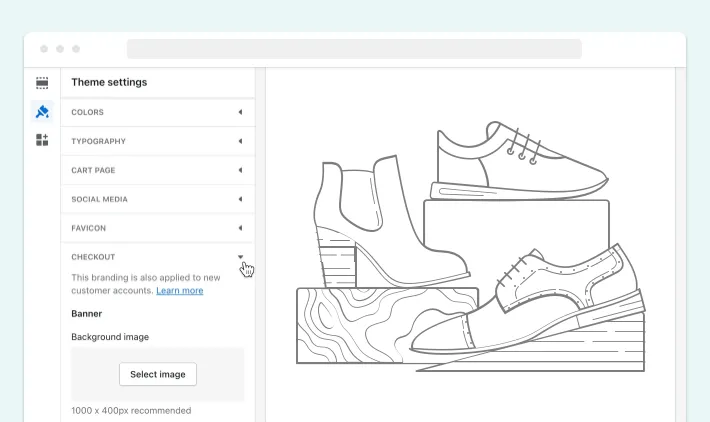
- Upload a 1000 x 400 px image and click ‘Save.’
Add a Logo to the Shopify Checkout Page
Your company logo will appear on top of your banner background image. Here are a few steps to add it.
- Open your Shopify Admin, select ‘Online Store,’ and then ‘Themes.’
- Click on a ‘Customize’ button near your current theme.
- Select ‘Theme Settings’ in a theme editor and go to the ‘Checkout’ section.
- In the ‘Logo’ section, click on the ‘Select Image’ button.

- Upload a logo image.
- Set a position for the logo.
- Set a size for the logo.
- Click ‘Save’
Add a Background Image or Color to the Main Content Area
You can modify the main content area’s color or background image to make it consistent with your online store’s overall design. This part of the Shopify checkout page allows customers to enter their shipping and payment info, so ensure your design choices don’t influence readability. Here’s how you can make these changes:
- Open your Shopify Admin, select ‘Online Store,’ and then ‘Themes.’
- Click on a ‘Customize’ button near your current theme.
- Select ‘Theme Settings’ in a theme editor and go to the ‘Checkout’ section.
- In the ‘Main Content Area’ section, click on the ‘Select Image’ button to add a background image or click on a ‘Background Color’ box to open a color picker. Remember that you can alter a background image or color, but not both.
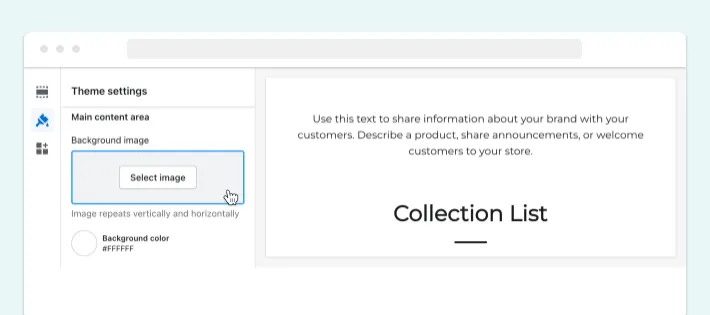
- Click ‘Save’ after making the necessary changes.
Change the Form Fields Color
You may also need to change the color of the form fields to ensure your customers can see the info they fill in clearly on your order page. Here’s what you can do:
- Open your Shopify Admin, select ‘Online Store,’ and then ‘Themes.’
- Click on a ‘Customize’ button near your current theme.
- Select ‘Theme Settings’ in a theme editor and go to the ‘Checkout’ section.
- In the ‘Main Content Area’ section, click on the ‘Form Fields’ drop-down to select the color. You have two options: making form fields white-colored or transparent.
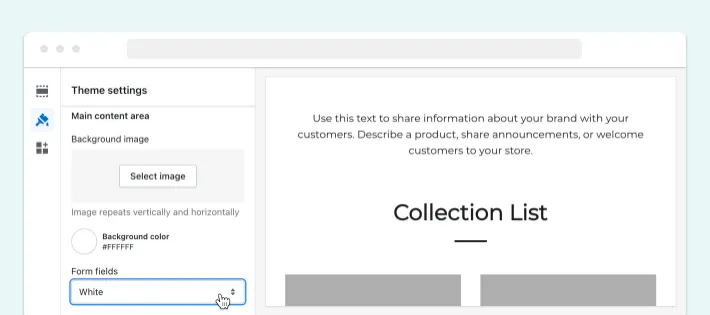
- Click ‘Save.’
Add a Background Image or Color to the Order Summary
When customers proceed to checkout, they’ll see a list of products they aim to purchase. You can add the background image to the order summary or change its color in the following steps:
- Open your Shopify Admin, select ‘Online Store,’ and then ‘Themes.’
- Click on a ‘Customize’ button near your current theme.
- Select ‘Theme Settings’ in a theme editor and go to the ‘Checkout’ section.
- In the ‘Order Summary’ section, click on the ‘Select Image’ button to add a background image or click on a ‘Background Color’ box to open a color picker. You can alter a background image or color, but not both.
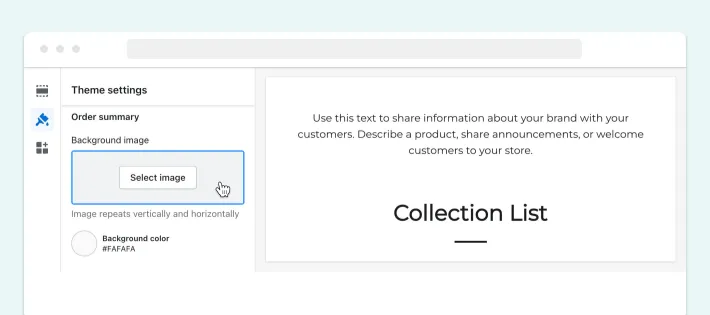
- Click ‘Save.’
Replace or Remove an Image from the Checkout Page
If you want to change or remove the image you added to the checkout page, you can do it in the following steps:
- Open your Shopify Admin, select ‘Online Store,’ and then ‘Themes.’
- Click on a ‘Customize’ button near your current theme.
- Select ‘Theme Settings’ in a theme editor and go to the ‘Checkout’ section.
- Scroll to the section where you want to replace or remove an image.
- Under the image you want to change, click on an ‘Update’ button and upload a new picture.
- Click ‘Save.’
Modify the Typography on the Shopify Checkout Page
You can also select the most suitable font for your online store. Here’s how to do this:
- Open your Shopify Admin, select ‘Online Store,’ and then ‘Themes.’
- Click on a ‘Customize’ button near your current theme.
- Select ‘Theme Settings’ in a theme editor and go to the ‘Checkout’ section.
- In the ‘Typography’ section, select the suitable fonts in the ‘Headings’ and ‘Body’ drop-downs.

- Click ‘Save.’
Modify the Button and Accent Colors
Shopify allows you to alter the colors of accents (links, checkmarks), buttons (gift cards, discounts), and errors (invalid fields) on the checkout page. Here are a few steps to do this:
- Open your Shopify Admin, select ‘Online Store,’ and then ‘Themes.’
- Click on a ‘Customize’ button near your current theme.
- Select ‘Theme Settings’ in a theme editor and go to the ‘Checkout’ section.
- In the ‘Colors’ section, you can open a color picker for ‘Accents,’ ‘Buttons,’ and ‘Errors’ to choose the appropriate colors.
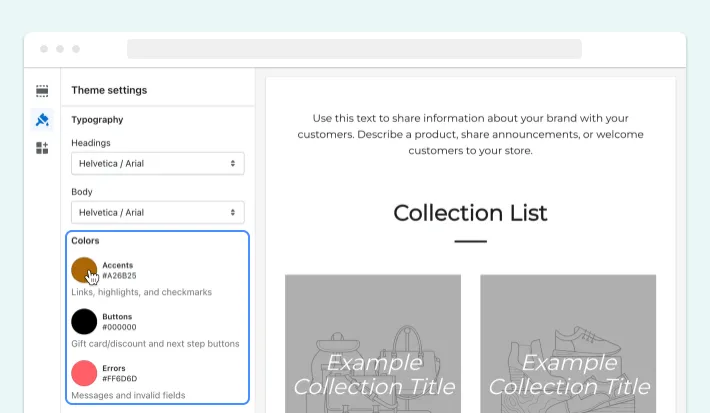
- Click ‘Save.’
Add Post-Purchase Features to the Checkout Page
Once your customer has completed a purchase, you can prompt them to shop more by introducing post-purchase features. You can do this by installing an app in the following steps:
- Visit the Shopify App Store and look for a suitable post-purchase app.
- Click ‘Add App.’
- Click ‘Install App.’
- Go to the ‘Apps’ section in your Shopify Admin, and select the post-purchase app.
- Set the necessary configurations in your app.
6 Useful Widgets and Apps for Shopify Checkout Customization
Another way to customize the checkout page in Shopify is using various apps, tools, and widgets. We’ve collected the most useful ones to help you with modification.
1. Order Bump
An order bump is a post-purchase app to help you with upselling and cross-selling. It can increase your average order value by encouraging customers to buy more. Check the OrderBump application for that purpose.
2. Timer Bar
Adding a timer bar to your custom checkout page on Shopify will create a sense of urgency in your customers and prompt them to complete their purchases as quickly as possible. For this, you can use, for example, the Essential Countdown Timer Bar app.
3. Trust Badges
Increase customer loyalty to your brand by adding trust badges to your checkout page. You can use the Trust Me app for this.
4. Shipping Protection
You can ensure the safety of deliveries through particular shipping protection applications. An example of such is Ship-Safely.
5. Social Proof
Add customer reviews and feedback to the Shopify checkout page to improve loyalty and trust. Use the Proof Bear app for this.
6. Shopify’s Checkout Extensibility
For an even higher level of customization and better sales, Shopify recently launched its Checkout Extensibility service. With it, you can deploy modifications with your custom apps or applications from the Shopify App Store. Developers can use Checkout UI extensions to alter the functionality and Shopify Functions to add new features and customize the backend logic.
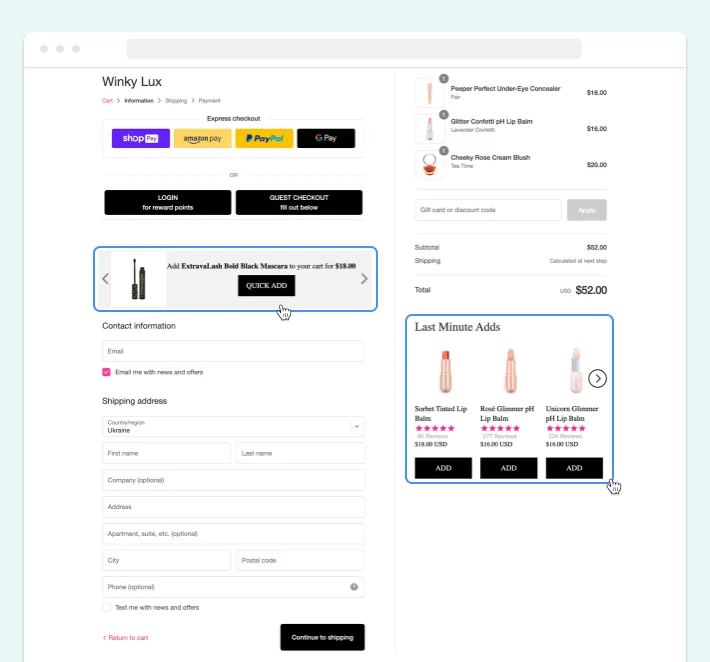
Here’s how the GenovaWebArt team implemented the upselling and cross-selling features in the Winky Lux online store via the LimeSpot Personalizer app:
Checkout Customizations with Shopify Plus
If you are a Shopify Plus store owner, Shopify custom checkout gets to a whole new level. You can access various dev tools and the checkout page code to alter it according to your precise specifications. Certainly, there are more, but here are just a few possible modifications:
- Add custom UI or content by using Checkout UI extensions. For example, you can display additional customer input or upsell/cross-sell products before checkout. Look at how our Shopify web design and development team did it for the Ten Thousand online store:
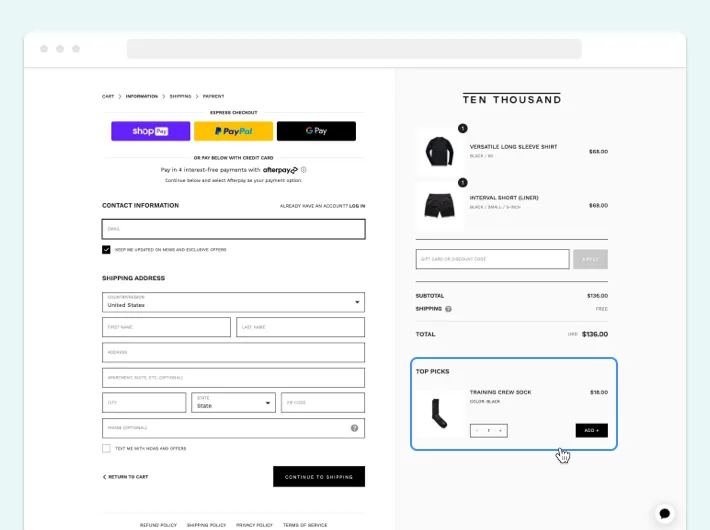
We introduced the upselling/cross-selling functionalities to Ten Thousand’s checkout page. - Customize your checkout design with Checkout branding. Access additional form field styling and change the branding colors.
- Customize checkout theme and content with Checkout liquid. Use code to alter the customer journey throughout checkout.
Test and Measure the Effectiveness of Your Shopify Checkout Page
Once your Shopify custom checkout page is ready, you should split-test it. It will help you measure the efficiency of implemented changes and decide what works best for your online store.
For example, you can compare your customized checkout page with default settings or contrast specific features. Conversion rate and average order value are the primary metrics you should track. With all that testing in place, you’ll ensure top-notch checkout effectiveness.
GenovaWebArt Experience
GenovaWebArt has customized numerous checkout pages on Shopify, and we can do the same for you. As you saw in the examples of Winky Lux and Ten Thousand, nothing is impossible for our team.
So, we can build a custom Shopify checkout page, sprinkle it with Shopify app development, and finalize it with a top-notch design. And we do this following your business requirements. Our team can also help with Shopify Plus checkout customization, leveraging code and various dev tools.
Got interested? Review other projects in our portfolio.
Wrapping Up
Increasing your sales, boosting your conversion rates, and getting more customers is possible if you Shopify customize checkout page. The editing process is straightforward: you can leverage theme editor, apps, widgets, or Shopify Extensibility.
Yet, if you feel your online store needs more than that, you can always engage experienced Shopify theme and checkout developers. GenovaWebArt’s experts are ready to tackle your customization tasks, so feel free to contact us right away.
