For beginners, the decision to launch a Shopify store can be an exciting yet overwhelming prospect, especially when you realize how many things (like product photos, customer reviews, shipping logistics, and legal documentary) you need to consider.
If you’re new to the business and don’t have much experience with these things, it might be even harder. The main challenge our clients encounter is that there are a lot of guides online — but they provide too much information, which is hard to digest.
GenovaWebArt is here to assist you. By relying on our vast experience, we’ll explain how to make a Shopify store from scratch and succeed in 2023.
This guide on launching a Shopify store will tell you everything you need to know about setting up your online shop, whether it’s your first or your 10th one. And if you want to know how much an e-commerce website costs, you can read our article.
What’s in?
Writing best-selling product descriptions, setting up social media marketing, and even knowing which paid Shopify apps are worth investing in!
Table of Contents
- Step 1: How to Open a Shopify Store
- Step 2: Add Your Products
- Step 3: Shipping Information
- Step 4: Create Additional Pages
- Step 5: Prepare the Shopify Store for Launch
- Step 6: Multilingualism in Shopify (optional)
- Step 7: Launching the Store
- Most Popular Shopify Apps
- Get Professional Help to Launch Your Shopify Store
- FAQ
Step 1: How to Open a Shopify Store
There’s an entire process between the decision to open a Shopify store and launching it for real.
In this section, we’ll guide you step-by-step through launching your first online store on Shopify. Check our Shopify store setup tutorial for beginners below!
Create a Shopify account
Once you decide to create a Shopify store, you should start with making an account. This Shopify store setup is one of the easiest possible: all you need to do is enter the Shopify site, and press Get Started. 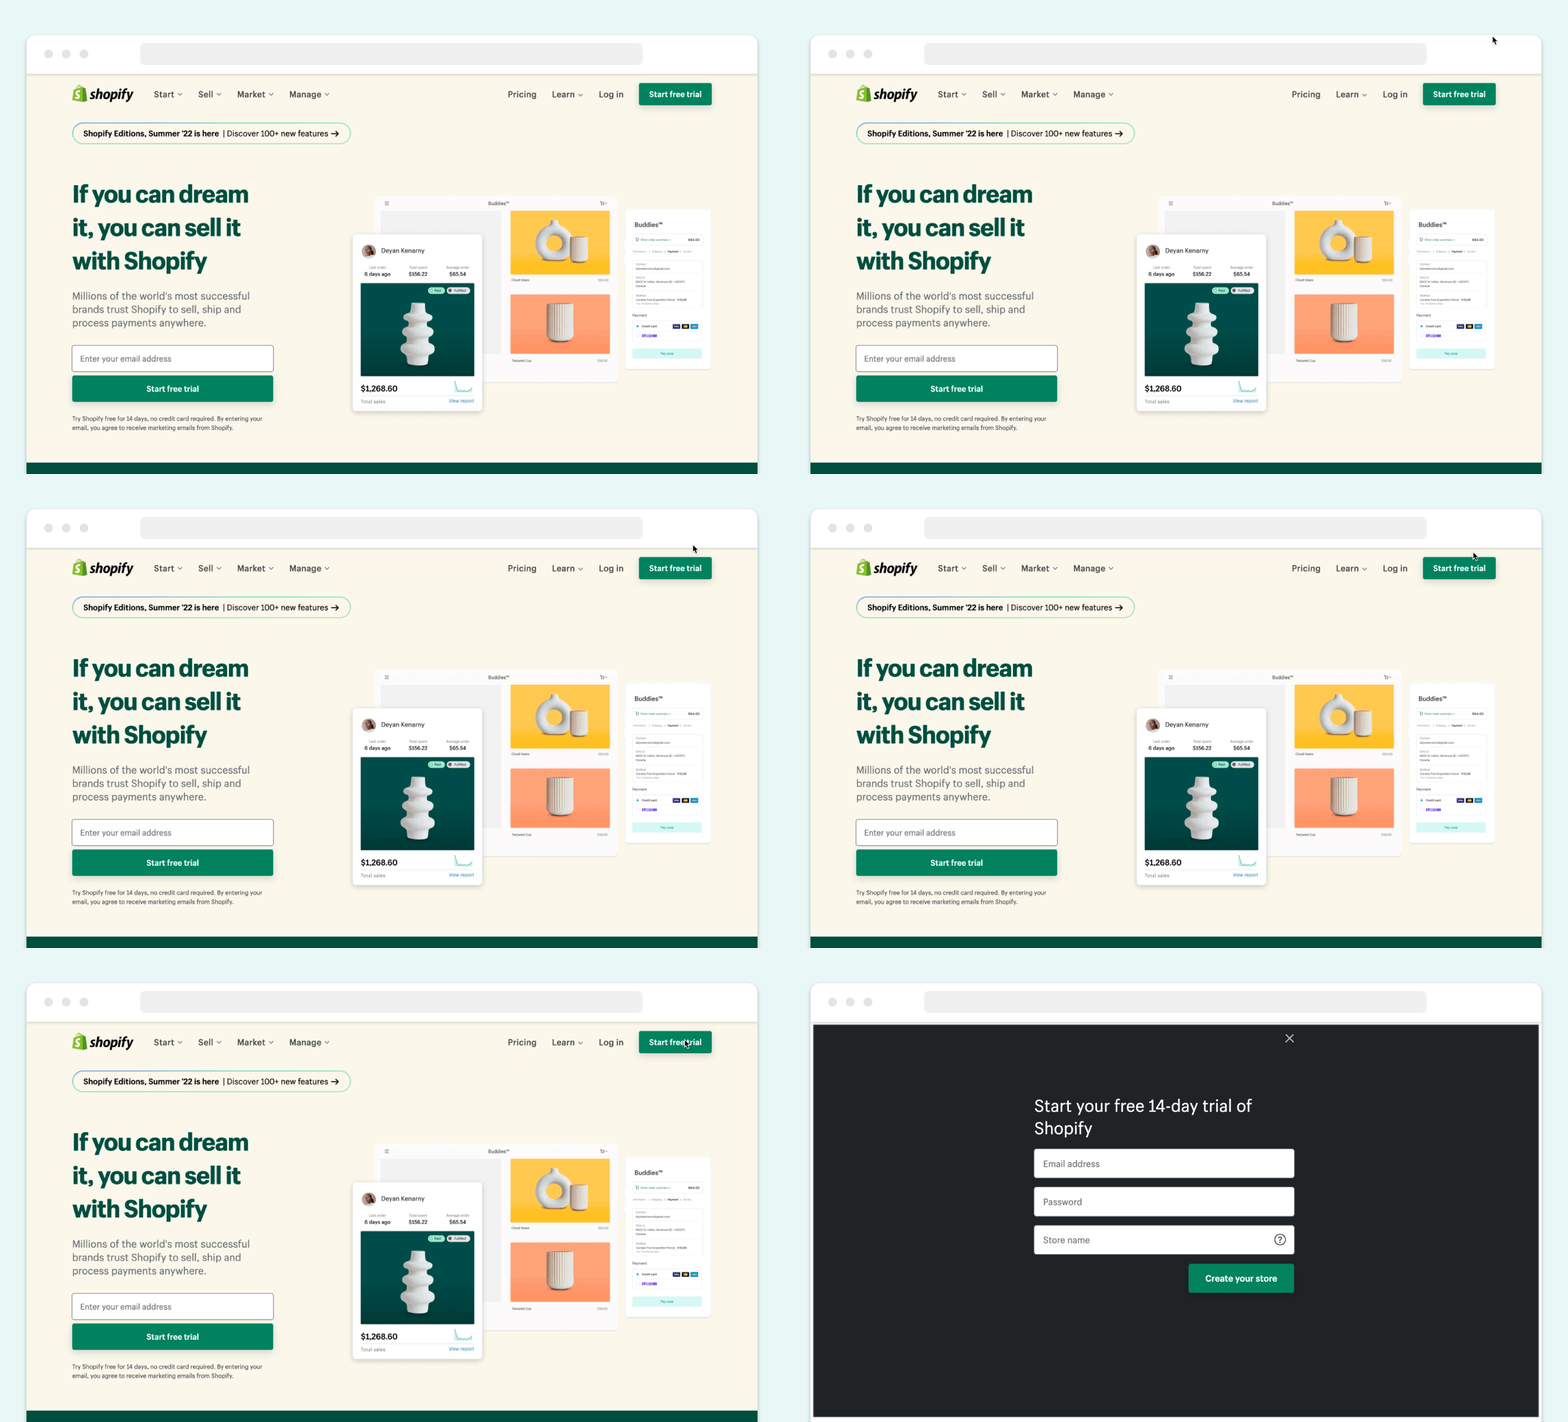
Things needed from you at this stage:
- Email address
- Password
- A unique store name (or a set of keywords that re
- Time to answer business-related questions
On the Shopify pricing page, the cost of making a Shopify account ranges from $29/month (Basic plan) to $229/month (Advanced plan). You don’t have to pay right away. However, the platform offers you a free trial for $1/month during the first three months of usage.
At this stage, choosing the right business username is the most responsible step. We recommend coming up with a list of 10-15 titles, checking their availability, and picking the most appropriate one among them.
Characteristics of the best business name:
- Short: Make your title memorable and keep its length up to 17 characters.
- Easy spelling: Check that your business title is easy to pronounce and connects with your audience.
- Available for a domain name: Come up with the name that can become your domain address.
- Creativity: It’s great if your business title is recognizable, understandable, yet eye-catching. Don’t hesitate to ask for help from your friends.
No worries if you’re still struggling with the best title for your future Shopify shop! You can use the Shopify Business Name Generator tool that will come up with a business title. It already includes several keyword recommendations to improve your store's visibility in search engines.
Choose a Theme and Set Up Your Store
The theme selection defines the appearance of your future store. That’s why we recommend taking this step seriously. Shopify has several beautiful themes for free, along with an even wider selection of premium ones. No matter your choice, the platform will let you edit its fonts, colors, carousel slides, and logo. By the way, we can develop a custom Shopify theme for you.
How to edit your Shopify theme:
- Visit Shopify Theme Store and pick the one you like. Alternatively, you can check TemplateMonster and ThemeForest for theme categories and features Shopify doesn’t offer.
- Click on the theme’s sample image for more information (for example, is it mobile-friendly) and try it with the View Demo button.
- If everything is great, click on the Add Theme and the Publish as My Shop’s Theme buttons.
- Customize your published theme in your Theme Manager.
Homepage design
The home page is the main page for your store with numerous features, from starting navigation to editing featured products and adding new products there.
The themes from Shopify Store are already adjusted to the platform, so you won’t need extra design skills to customize them. If you don’t like your current theme and want to change your Shopify homepage design, simply search for the new one among the options available.
Configuring the navigation menus
To add or change menus and improve the website navigation, go to Shopify admin, and in the Navigation section, edit the Menu items you see there. Note that each item can have multiple dropdown levels, so group your menus accordingly and consider usability during Shopify setup.
Customizing colors, typography and other theme options
Some themes offer to adjust advanced features like colors and fonts. The availability of this option depends on where page-building apps come in.
Configuring order placement
Theme and customization choices affect the checkout on your Shopify store, so make sure you’ve checked and adjusted the order placement settings so that everything runs smooth. Adjust payment settings in this block on your store.
In short, whenever you want to choose the exact design, pay attention to critical elements in it, including a logo and general styles on the color palette of the site. All the other design elements are easily customizable in the Shopify menu.
Setting up payment gateways and payments
Once you decide to choose a payment provider, we recommend going for a platform-native Shopify Payments gateway and connecting Stripe and PayPal as the most popular payment processing systems:
- Shopify Payments: That’s the easiest payment gateway to connect to Shopify, and it works with physical and online payments from 20 countries. The commission is 2.2%. To activate Shopify Payments, just launch it on the Payment Providers page in Shopify.
- Stripe: This payment gateway is popular in the US, works with 40 countries, and accepts more than 100 currencies. Its commission is 2.9%. To connect Stripe on Shopify, find it under the Third Party Credit Card Provider button in the Payment Providers menu on your Shopify account. Note that you will see Stripe there if only your country is eligible and this payment provider can operate there.
- PayPal: It is accepted in over 203 countries, with fees ranging from 1.9% to 3.4%. The process of adding this payment gateway is similar to Stripe.
Step 2: Add Your Products
When answering how to launch a Shopify store, you must definitely add your products. You cannot create a Shopify store without products to offer. On the platform, the process for adding new items includes filling 10 fields we describe below.
Write the name and description of your product
Creating the basic description and the proper name for your product is the initial step of setting up your Shopify account. The information accuracy matters here, so dedicate time to creating something informative and unique for each product you will offer.
Here is the information you need to work on at this stage:
- Product title: Make it clear, short, and specific.
- Product description: Uncover detailed information that makes this product different from others.
To write a good product description, keep in mind customer needs, highlight incentives, address the typical questions, work on readability and flow, and make the readers feel your product through words. Don’t hesitate to be creative, separate sentences in paragraphs, and add formatting and emojis.
Upload product photos or other media files
Shopify has the Media section for presenting visual information about your products. Use it to upload photos, GIFs, videos or 3D models. In Shopify, you can edit them a bit — like crop, resize, and add the Alt Text.
The rules of a good visual are high quality, the best light, the sharpest clarity, and the same aspect ratio for all products.
Set the price
Pricing is a separate section in Shopify, so you can work on the cost of each product separately and with precise attention.
The platform offers several helpful optional fields here.
For example, there is the Compare at price field to see the average price for such a product on Shopify. It can be useful for vendors who cannot decide on the final cost of their products. Another optional field is Cost per item which lets you track a profit margin.
Inventory
Proper inventory management fixes the problems of extra or missing product items unless you rely on dropshipping and a print-on-demand service. In Shopify, you’ll have the menu for inventory that contains:
- SKU (Stock Keeping Unit)
- Barcode (ISBN, UPC, GTIN, etc.)
- Quantity and location
Shipping
This section is for getting shipping rates and a relevant label for each order. The Shipping section contains the following information:
- Product weight
- Customs information
Variants
In Shopify, you can select several options for your product — for example, if it comes in different colors, sizes, or styles. The system will let you indicate several items as variants of the same product. Information you can indicate here:
- Product image
- Variant value (individual settings of size, color, etc.)
- Price
- Quantity
- Tracked inventory
Note that you need to set up the settings mentioned in this section above for each product variant individually.
Organization and availability
The product organization section lets you group products to manage catalogs easier and provide a better user experience to your customers. The labels for products include:
- Product availability (sales channels where you list your products)
- Product type (a specific product category for each item)
- Vendor (manufacturer, wholesaler, or third-party vendor for the item)
- Tags (product keywords)
- Collections (based on the season, discount, new arrival, etc.)
Previewing search engine listings
Shopify offers you to see how your product will be displayed on Google — and work on this preview. For better result, search for relevant keywords for each product and add in the fields in this section:
- Page title (up to 55 characters): Describe your product and add target keywords.
- Meta description (up to 150 characters): Create a short overview of a product that encourages users to click on the link.
- URL handle: Include a product name so users can easily find it.
Don’t hesitate to use keyword research tools and ask for help from SEO specialists to improve your results in search engines.
Organizing your products into a collection
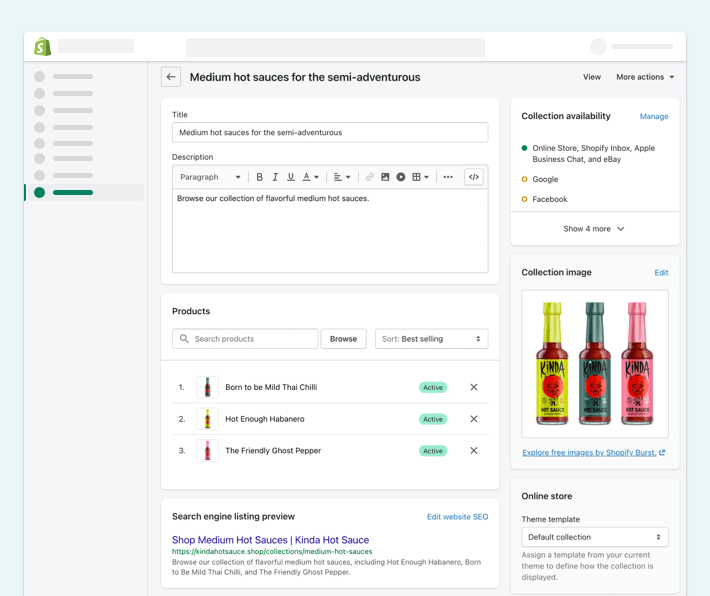
When you have a considerable volume of various products in your shop, collections will help you manage them. Group your products into collections based on their unique offering — be that a target audience, a theme or a category. Collections allow you and your customers to navigate the website and finding the products for display.
Edit SEO title and description for optimization
It’s a good practice to build a Shopify store with a basic SEO understanding. We recommend not only adding keywords to your products but also tracking their performance and adjusting if needed. This way, you’ll keep the visibility of your website on Google high and keep getting the best results after the first launch of your Shopify store.
Step 3: Shipping Information
When you set up a Shopify store, it’s important to add information about shipping so that you can control your profits and offer a great experience to your buyers.
Shopify offers several shipping options:
- Free shipping: You can apply it to certain products, amounts, and regions.
- Real-time carriers: Partner with popular carriers like USPS and DHL to have more convenient shipping options for customers.
- Flat-rate shipping: Apply for products with similar sizes and weights for easier forecasting of shipping cost.
- Local delivery: Offer an option to pick up an online order at a local pickup station.
Add Shipping Zones
Your shipping strategy may include several shipping zones that have different rates. Find the Shipping and delivery menu in the Settings to add delivery zones. You can manage rates, customize them, and activate backup shipping rates on this page.
Set Price for Each Shipping Zone
To set a different cost for each zone, press the Add rate button near a zone you want to setup. The field will allow you to set up your own rates or use a carrier or app to calculate rates. If you choose the first option, you can edit the rate name, set the price, and link the rate to either an item weight or an order price.
Step 4: Create Additional Pages
When you set up a Shopify store, don’t forget to work on supporting pages. Pick a wise approach to adding new pages, meaning selecting the pages to be added immediately and the type of information inside them.
The full list of additional pages includes:
- Contact Us
- About
- FAQ
- Return policy
- Refund policy
- Shipping policy
- Privacy policy
- Terms and conditions
We recommend working on About Us, Contacts, Shipping, Privacy Policy and Terms and Conditions first.
About Us
This is the place to describe your business model, establish trust with your customers, and share your corporate story. Be creative and mention everything valuable: it’s a great idea to post a video presentation and put links to awards and public acknowledgments on this page.
If you don’t have a story to share, you can start with the About Us page template and edit it later.
Contacts
Make it clear how a customer can refer to you for consultation. Also, it’s a good practice to have the FAQ section where you publish answers to the typical questions your buyers ask. A chatbot offering 24/7 support is also a wise idea.
Shipping
The shipping part of a purchase is the stage where unexpected fees and delays may happen. That’s why it’s essential to have a separate place where you describe how your shipping works. You should mention shipping costs, manufacturing times, and delivery speeds for particular regions.
Private Policy
Privacy policy is essential for any website, so we recommend taking a legal consultation on the requirements to ensure you’ve mentioned everything needed and used correct expressions. Alternatively, you can work with Shopify's template in the Legal section under Settings.
Terms of Conditions
Similar to the Privacy Policy, the Terms of Conditions page requires validation from your lawyer and can be elaborated based on the Shopify template. In legal terms, it’s an agreement with your customers on rights you both keep and principles of communication and interaction.
Step 5: Prepare the Shopify Store for Launch
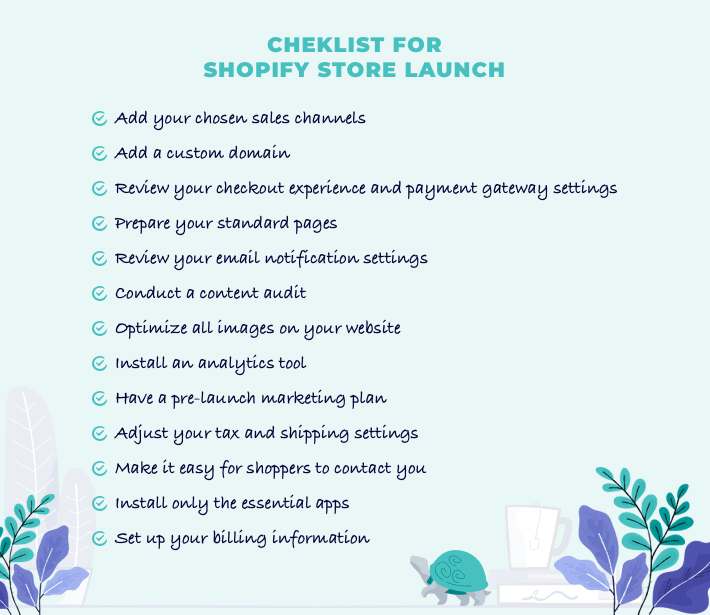
The final steps to verify that you make a good Shopify store before the launch include adding a domain, working on marketing, placing a test order and polishing Shopify settings. We’ll describe the details below.
Adding a Domain
A domain name stands for the online address of your webshop. On Shopify, you can set up a domain and create its name or link a third-party domain to the Shopify platform.
Register a new domain (optional)
For brand recognition, you can think of using a custom domain with a name that feels suitable for your business. Then, if it’s not occupied by anyone, you can link it directly via Shopify.
Note that the domain price on Shopify ranges from $9 to $14 per year, while the services from the most popular hosting companies (like GoDaddy and Bluehost) start from $11/year. The advantage of going for Shopify is that the platform takes over your website support and maintenance.
Connect your domain to Shopify
Click on the Domains section in your Online Store menu to add a new domain. There you can work on the Add an Existing Domain field. Once successful, the domain will get the Connected status in the system.
Setting Up Appropriate Sales Channels
Since an online store is only one of several sales channels you can possibly have, the platform offers an opportunity to create a unified shopping experience via the same Shopify accounts.
Your Shopify options may include:
- Shopify point-of-sale solution (for synchronizing physical retail sales with an online store)
- Social media (linking Facebook Shop, product tags on Instagram, Pinterest)
- Wholesale
- Marketplaces (eBay, Amazon, Rakuten, etc.)
- Google channel (list your product on the Shopping tab in Google)
- Buy Button (to put on your existing website)
You can view and add all the possible sales channels in the Shopify App Store. To work with the channels, visit the Product Availability section.
Setting Up Email Notifications (Optional)
Shopify has templates for automatic email you can use. The typical order-related events include confirmation, edit, invoice, cancelation, refund, and draft order invoices.
You can customize these notifications and use templates of variable documentation. For this, go to the Notifications section in the Settings.
Setting Up Your Store for Marketing
The practical marketing tools for a Shopify store include ads, content creation, and building an audience. Make sure you have worked on your marketing plan before launching a Shopify store.
For more tactics on attracting people to your Shopify store, check our guide on 15 tips to drive traffic to your Shopify store.
Ordering System Test
Placing a test order is a great way to check that everything works smoothly. Go through the whole process and note if it’s smooth and user-friendly.
To complete the payment, use one of 3 options:
- Shopify’s Bogus Gateway to simulate a transaction. For card details, invent a two-word name, any future date for expiry date, and any three digits for security code.
- A real payment provider, but immediately cancel and refund the order
- Test mode in Shopify Payments
Editing Shopify Settings
You can always come back and polish the Shopify Settings selected. Everything remains available in your admin panel. Usually, the most common features for editing include:
- Logo adjustment
- New slides to a homepage carousel
- Adding information to Shopify product pages
- Editing collections
- Colors on theme
- Fonts on theme
Step 6: Multilingualism in Shopify (optional)
When you launch an online store with Shopify and have an idea to scale your business, you have an option to make it multi-language. You will need to install an app that supports translation to several languages.
Translation Apps
From our experience, we can recommend Transcy - Translate & Currency and Translation Lab - AI Translate as your translation apps. These free options will translate anything in your store to the native language of your customers within several minutes.
How to Install Translation Apps
Go to the Shopify App Store and click the Add App button to install any translation app. Here are the links for Transcy and Translation Lab we’ve recommended.
Step 7: Launching the Shopify Store
Since everything is ready, it’s time to start a Shopify website for real and make it visible to everyone!
How to Enable the Store
If you want to enable your store to everyone, you need one thing only — hit the Press button. After that, your online store goes live and becomes visible to your customers. For this moment, your editing history will be public (as everyone can trace how it was before). Still, you’ll be able to improve the selling experience based on the real customer feedback with Shopify apps.
Most Popular Shopify Apps
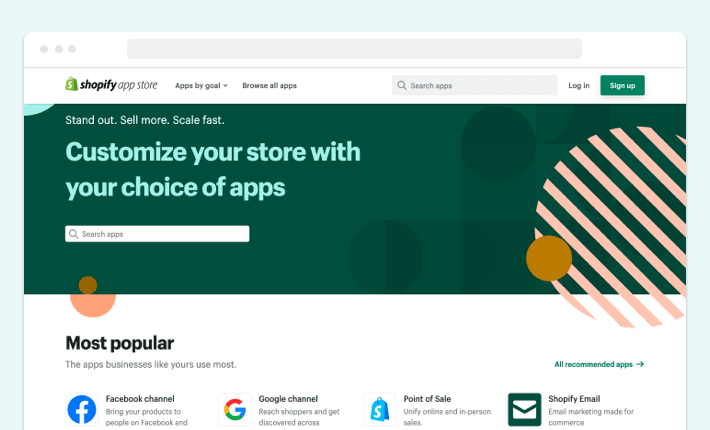
On the Shopify App Store, many Shopify apps are designed to make the work of your Shopify store easier. This section will overview the top Shopify apps you should install to facilitate your work and increase your conversion rates.
Free Apps
Going for cost-free options is a great start for getting acquainted with Shopify apps and checking their effectiveness and usability for your store.
Facebook Channel
We highly recommend adding the Facebook Channel app while you launch your Shopify store, not after the launch. It’s among the top social media channels you can link with Shopify, linking Facebook and Instagram in one app.
The features of the app include:
- Advertising with free and paid ads through Pixel and Conversions API
- Sell from anywhere with Facebook Shops
- Sell products with Instagram Shopping
Google Channel
Another must-have app for Shopify. Google Channel lets you get a free listing of your Shopify products on Google. The full list of available countries is mentioned on the app page.
The features of the app include:
- List products on Google
- Seamless checkout with Buy on Google (for eligible US businesses)
- Paid Smart Shopping campaigns on Google
Buy Now Button
A strong call to action is a must for any shopping experience. In this regard, Buy Button channel from Shopify offers a smooth experience of adding a Buy Now button to your website or blog.
The features of the app include:
- Customize fonts, colors, and layouts of the button
- Update product details without editing the code on the website
- Fulfill orders after the button click
- Track sales on the Home sales overview and Analytics page
- Create checkout links
Shopify Email
An email marketing tool from Shopify, Shopify Email offers to design emails, use pre-built templates, and manage Shopify campaigns.
The features of the app include:
- Making and customizing branded emails
- Email marketing templates collections: products, sales, restock, newsletters, holidays, etc.
- Email personalization
- Duplicate previous emails
- Scheduling tool
- Email segmentation and automated campaigns
- Results tracking: open and click-through rates, products added to carts, purchases.
Booster: Page Speed Optimizer
Booster lets you work on your page speed to prevent lost sales and improve user experience on your Shopify store.
The features of the app include:
- One-click page speed improvement
- No coding
- Help SEO
Paid Apps
Paid Shopify apps enhance a certain function in your Shopify store, so their price should justify your investment to be worthy. Here, we’ll recommend the most effective apps for established Shopify stores that have proved their effectiveness to our clients already.
ShipStation
Price: $9.99/month with a 30-day free trial
ShipStation improves the shipping experience of your Shopify store, meaning better sync and delivery.
The features of the app include:
- Connect to global carrier services (UPS, FedEx, DHL, Canada Post, etc.)
- One platform for all orders
- Organize, automate, and streamline order fulfillment
- Branded delivery
- Select the preferred shipping method
Point of Sale
Price: $89/month, free Lite plan available
Shopify POS is an app that assists in inventory management, increases your set of features for more sales, and lets you build stronger relationships with your buyers.
The basic features of the app include:
- Accept payments on iPhone/iPad
- Customer profiles (created online or in-person)
- Product catalog management
- Unlimited product SKUs
- Manage online and in-store orders in one place
- Gift cards
- Connect integrated hardware
- Split payments
- Email carts and email receipts
The Pro features of the app include:
- Unlimited registers and POS staff
- Local pickup for online purchases
- Shipment to customer
- Staff roles and permissions
- Daily sales performance
- Payment tracking
- Advanced inventory
- Automatic discount
- QR code login for POS devices
Judge.me Product Reviews
Price: $15/month, free plan available
Get Judge.me app for getting more reviews that customers will write for you directly in their emails. Such an opportunity to collect reviews on autopilot lets you get more star ratings and boost sales with social proof.
The features of the app include:
- Compatible with Online Store 2.0
- Sync with AliExpress Review Importer and Checkout Comments
- Product reviews with text, photos and videos
- Review Carousel
- Q&A, custom forms, questions
- Social media integration
- SEO Rich Snippets
- Automatic social push to Facebook, Instagram and Twitter
Mailchimp: Email Marketing
Price: from $11/month to $299/month, free to install
This Shopify app helps to build a Shopify business with email and marketing automation. Mailchimp drives sales, leverages AI-powered insights, and lets you grow but keep reaching the right customers.
The features of the app include:
- Customized automations
- Flexible templates
- AI-generated custom designs
- Advanced personalization and segments
- Expert insights and recommendations
- Growth-focused reporting and analytics
- Built-in product recommendations
- Brand and content studio
Tidio: Chat & Chatbots
Price: from $19/month to $49/month, free plan available
Tidio is the live chat adjusted to the business needs, meaning getting an intelligent bot that will reclaim abandoned carts and increase sales with practical and well-written algorithms. With the app, you’ll get a single platform for live chat, email, and messengers.
The features of the app include:
- Use Live Chat
- Provide 24/7 support to customers
- Offer self-service
- Combine all communication channels in one place
- See live visitors and initiate a conversation
Get Professional Help to Launch Your Shopify Store
As you can see in this Shopify step-by-step guide, starting a Shopify store is not a complicated task if you have detailed instructions and rely on the best practices. Providing you with such information was our goal in this post. All you need now is time and a business idea for your Shopify store in mind!
If you still need a better understanding and a deeper dive into the topic, don’t hesitate to contact us directly. We’re ready to answer any questions concerning how to launch a Shopify store and give you any sort of consultation you need. Even more, we can take over the task of creating a Shopify store for you, making sure you have a smooth launch and a solid online presence. We also offer Magento to Shopify migration service, so if you’re looking to switch to Shopify from Magento, we can help you with that as well.
We at GenovaWebArt agency specialize in making Shopify solutions for various industries. For the last 9 years, we've helped create more than 200 incredible Shopify stores for global consumer markets — including beauty, nutrition, and sportswear brands.
We can help you launch a Shopify store that will bring maximum value to your business — or improve your current Shopify webshop with Shopify design, Shopify e-commerce development or Shopify theme development & customization services.
Talk to us, and we’ll explain everything in detail!


![Shopify Checkout.liquid to Shopify Checkout Extensibility [Guide] - GenovaWebArt blog article, banner image Shopify Checkout.liquid to Shopify Checkout Extensibility [Guide] - GenovaWebArt blog article, banner image](https://genovawebart.com/hubfs/img/webp/hero-banner-blog-article-shopify-checkout-extensibility.webp)
